How to Give First Aid to Your Dog

first aid dog
Playing Vet with your dog? MrPliskim / Getty Images

Have you ever seen a dog injured in a fight or hit by a car? Perhaps you could only shake your head and walk away. Not because you didn't care, but because you didn't know how to approach and examine the dog or what to do next. Especially if you have a dog of your own, you'll want to be prepared, for your dog depends on you for help in an emergency situation.

This article will give you the information and techniques you'll need to confidently administer first aid and perhaps save the life of a pet. From administering CPR to treating an insect bite, you'll learn how to deal with a wide range of dog emergencies.

Advertisement

Let's begin by learning how to properly restrain a hurt and frightened dog, since this will be the first order of business to treat most dog injuries.

Restraining an Injured Dog

An injured dog is usually frightened and in pain, and unless it feels very secure with your presence, it may try to escape or even bite you. So, it's important to use the following tips when approaching an injured dog.

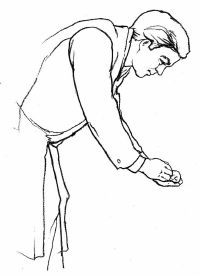
Step 1: Approach the dog slowly, speaking in a reassuring tone of voice.

Step 2: Move close to the dog without touching it.

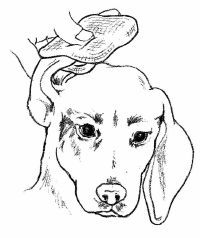
Step 3: Stoop down to the dog. While continuing to speak, observe its eyes and facial expression.

Step 3a: If the dog is wide-eyed and growling, DO NOT attempt to pet it. Proceed to Step 4.

Step 3b: If the dog is shivering, with its head lowered and a "smiling" appearance to its mouth, pet the dog for reassurance, first under the jaw. If this is permitted, pet the dog on the head.

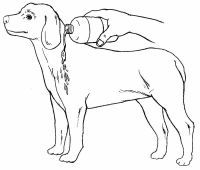
Step 4: Slip a leash around the dog's neck. Use whatever material is available -- a rope, a tie, a belt, or torn rags.

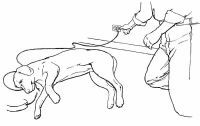
Step 5: If you are alone, place the leash around a fixed object, such as a fence post. Pull the dog against this object and tie the leash so the dog cannot move its head.

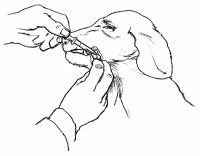
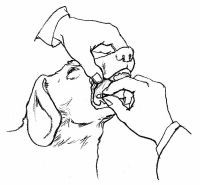
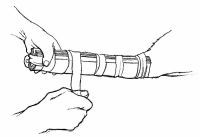
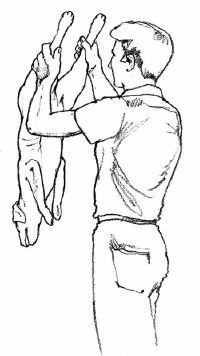
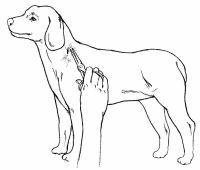
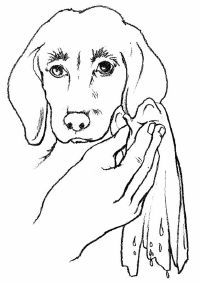
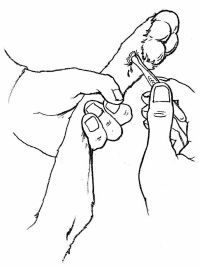
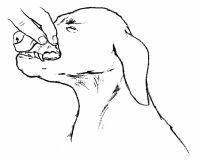
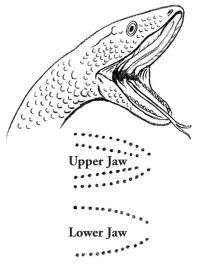
Step 6: Muzzle the dog to protect yourself.

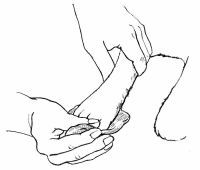
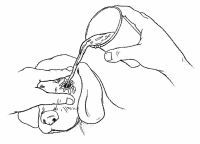
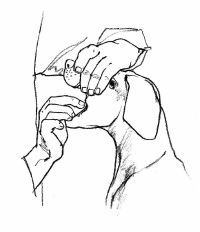
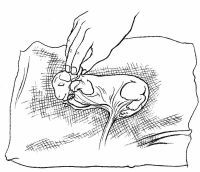
Step 6a: Using a long piece of rope, torn rags, or a tie, loop over the dog's muzzle and tie a single knot under the chin.

Step 6b: Bring the ends of the rope, rags, or tie behind the ears and tie them in a bow.

Step 7: If you are alone, proceed to administer treatment.

If You Have an Assistant

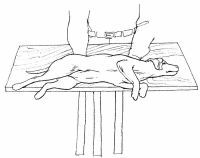
Step 8: If possible, place the dog on a table or other raised surface.

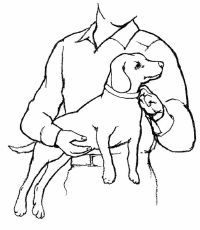
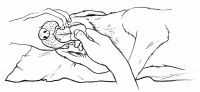
Step 8a: If the dog is small, grasp its collar with one hand, and place your other arm over its back and around its body. At the same time, pull forward on the collar and lift the dog's body, cradling it against your body.

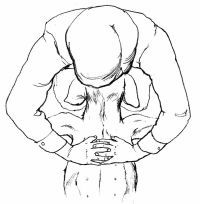
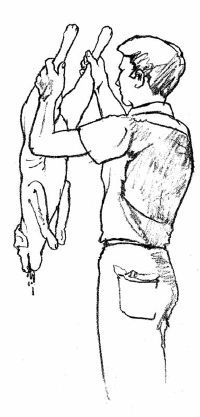
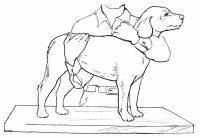
Step 8b: If the dog is large, slip one arm under its neck, holding its throat in the crook of your arm. Be sure the dog can breathe easily. Place your other arm under the dog's stomach. Lift with both arms.

Step 8c: If the dog is very large, slip one arm under its neck, holding its chest in the crook of your arm. Be sure the dog can breathe easily. Place your other arm under the dog's rump and, pressing your arms toward one another, lift the dog.

Step 8d: Have your assistant administer treatment while you hold the dog on the table.

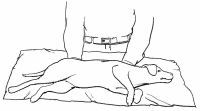
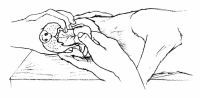
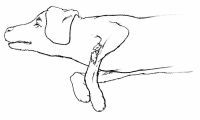
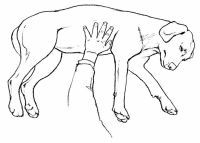
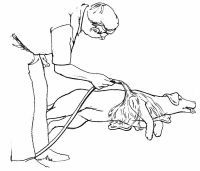
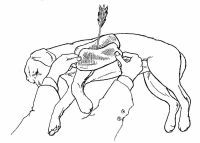
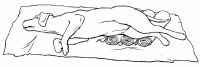
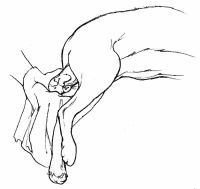
Step 9: If you want the dog on its side:

Step 9a: Stand or kneel so the dog is in front of you with its head to your right.

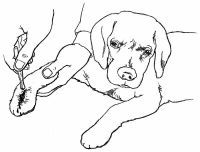
Step 9b: Reach over the dog's back and grasp the front leg closest to you with your right hand and the rear leg closest to you with your left hand.

Step 9c: Push the dog's legs away from you, and slide the dog down your body.

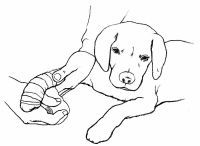
Step 9d: Grasp both front legs in your right hand and both rear legs in your left hand.

©2006 Publications International, Ltd.Steps 9d and 9e

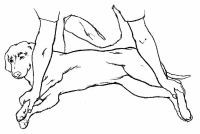
Step 9e: Hold the dog's neck down gently with your right arm.

Step 9f: Have your assistant administer treatment.

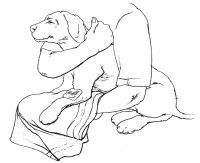
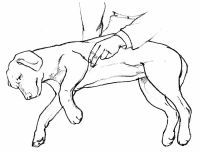
Step 10: If you want the dog sitting:

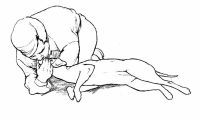
Step 10a: Slip one arm under the dog's neck, holding its throat in the crook of your arm. Be sure the dog can breathe easily.

Step 10b: Place your other arm over the dog's back and around its stomach.

Step 10c: Pressing the dog against your body, apply body weight to the dog's rear quarters.

Step 10d: Have your assistant administer treatment.

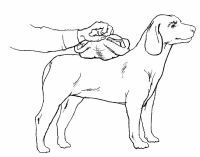
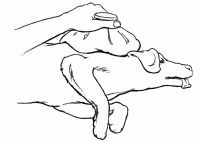
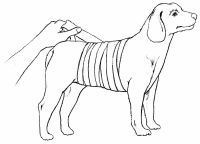
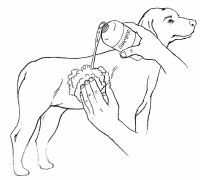
Step 11: If you want the dog standing:

©2006 Publications International, Ltd.Steps 11a and 11b

Step 11a: Slip one arm under the dog's neck, holding its throat in the crook of your arm. Be sure the dog can breathe easily.

Step 11b: Place your other arm under the dog's stomach.

Step 11c: Press the dog toward your body and lift upward.

Step 11d: Have your assistant administer treatment.

Learning how to restrain a dog will help you in almost any pet emergency situation. Now let's take a look at how to transport that injured dog to the veterinarian.

How to Transport an Injured Dog

©2006 Publications International, Ltd. Step 1a

Once you've restrained the injured dog, you'll want to get it to a veterinarian as soon as possible. Try not to move a hurt dog more than necessary, and have someone call the veterinarian to be certain he or she is prepared for your arrival. In the meantime, use the following tips to help you transport your pet with the utmost care.

If the Dog Can Be Lifted

Step 1: If the dog is small:

Advertisement

Step 1a: Grasp its collar with one hand and place your other arm over its back and around its body.

Step 1b: At the same time, pull forward on the collar and lift the dog's body, cradling it against your body.

Step 2: If the dog is large:

Step 2a: Slip one arm under its neck, holding its throat in the crook of your arm. Be sure the dog can breathe easily.

Step 2b: Place your other arm under the dog's stomach. Lift with both arms.

Step 3: If the dog is very large, slip one arm under its neck, holding its chest in the crook of your arm. Be sure the dog can breathe easily. Place your other arm under the dog's rump and, pressing your arms toward one another, lift the dog.

Step 4: Transport the dog to the veterinarian.

If the Dog Needs a Stretcher

©2006 Publications International, Ltd. Step 1a

A flat board must be used if a broken back is suspected.

Step 1: Use a blanket or flat board as a stretcher. If you are using a board proceed to Step 2. If you are using a blanket:

Step 1a: Place one hand under the dog's chest and the other under its rear; carefully lift or slide the dog onto the blanket.

Step 1b: Transport the dog to the veterinarian.

Step 2: If you are using a flat board:

©2006 Publications International, Ltd. Steps 2b and 2c

Step 2a: Depending on the size of the dog, use a table leaf, an ironing board, a large cutting board, or a removable bookshelf. Make sure whatever you use will fit in your car.

Step 2b: Place 2 or 3 long strips of cloth or rope equidistant under the board, avoiding the area where the dog's neck will rest.

Step 2c: Place one hand under the dog's chest and the other under its rear; carefully lift or slide the dog onto the board.

Step 2d: Tie the dog to the board.

Step 2e: Transport the dog to the veterinarian.

Another technique that can come in handy in many first-aid situations is giving oral medication to your pet. Check the next page for some helpful tips on administering medication.

How to Administer Oral Medication to a Dog

©2006 Publications International, Ltd. Steps 3 and 4

Whether you need to administer pain medication after a serious injury or it's just time for your pet's monthly heartworm pill, learning how to easily give oral medication to a dog is a helpful trick to know. Use the following tips to help you give either liquid or pill medication to your dog.

Liquids

Step 1: Restrain the dog. If the dog is hard to handle, you may need help restraining it.

Advertisement

Step 1a: Relieve the dog's apprehension by talking quietly and reassuringly.

Step 1b: Slip one arm under the dog's neck, holding its throat gently in the crook of your arm. Be sure the dog can breathe easily.

Step 1c: Pass the other arm over or under the middle of the dog, using gentle but firm pressure to hold its body against yours.

Step 1d: If necessary, apply a mouth-tie loosely so there is only slight jaw movement.

Step 2: Gently tip the dog's head slightly backward.

Step 3: Pull the dog's lower lip out at the corner to make a pouch.

Step 4: Using a plastic eyedropper or dose syringe, place the fluid a little at a time into the pouch, allowing each small amount to be swallowed before giving any more of the dose.

Step 5: Gently rub the dog's throat to stimulate swallowing.

Pills

Step 1: Restrain the dog. If the dog is hard to handle, you may need help restraining it.

Step 1a: Relieve the dog's apprehension by talking quietly and reassuringly.

©2006 Publications International, Ltd. Steps 2, 3, and 4

Step 2: Grasp the dog's upper jaw with one hand over its muzzle.

Step 3: Press the dog's lips over the upper teeth by pressing your thumb on one side and your fingers on the other so the dog's lips are between its teeth and your fingers. Apply firm pressure to force its mouth open.

Step 4: Hold the pill between the thumb and index finger of your other hand, and place the pill as far back in the dog's mouth as possible.

Step 5: Gently rub the dog's throat to stimulate swallowing.

An alternate method is to hide the pill in cheese, peanut butter, or other yummy treat.

Blood on a dog can be a sign of a serious injury or just a slight nick to the paw. In the next section, we'll discuss how to spot the various signs and what to do to help a bleeding pet.

How to Treat a Bleeding Dog

©2006 Publications International, Ltd. Step 2

A dog's paws and legs are vulnerable to injury from broken glass, nails, and other sharp objects, and they will bleed heavily when cut. An injured ear will also bleed heavily because the skin over the ear is so thin.

With any bleeding injury, the main purpose of first aid is to prevent excessive blood loss, which can lead to shock. The signs of shock include pale or white gums, a rapid heartbeat, or rapid breathing. If any wound is spurting blood, it means an artery has been cut. This requires immediate professional attention.

Advertisement

How you tend to your dog will depend on the location and extent of the bleeding. The following dog care tips will help you apply first aid to various body areas.

Dog's Bleeding Head or Torso

Step 1: Restrain the dog if necessary.

Step 1a: Approach the dog slowly, speaking in a reassuring tone of voice.

Step 1b: Slip a leash around the dog's neck, then place the leash around a fixed object. Pull the dog against this object and tie the leash so the dog cannot move its head.

Step 1c: Muzzle the dog to protect yourself.

Step 2: Cover the wound with a sterile gauze pad, clean folded towel, or sanitary napkin.

Step 3: Wrap torn rags or other soft material around the dressing and tie or tape it just tightly enough to hold the bandage in place.

Step 4: Transport the dog immediately to the veterinarian.

Dog's Bleeding Leg, Paw, or Tail

Step 1: Restrain the dog if necessary.

©2006 Publications International, Ltd. Step 3

Step 1a: Approach the dog slowly, speaking in a reassuring tone of voice.

Step 2: Clip the hair around the injured area.

Step 3: Examine the wound for glass or other foreign objects. If visible, remove the object with your fingers or a pair of tweezers. If the tissue under the wound appears to pass by when you move the skin, the wound will probably require stitches.

Step 4: Flush the wound thoroughly with clean water. Avoid home antiseptics, which may cause pain when applied.

Step 5: Cover the wound with a clean cloth, sterile dressing, or sanitary napkin.

Step 6: Place your hand over the dressing and press firmly.

©2006 Publications International, Ltd. Step 8

Step 7: Keep pressure on the dressing to stop bleeding. If blood soaks through the dressing, DO NOT remove it. Apply more dressing and continue to apply pressure until the bleeding stops. If the bleeding does not stop within 5 minutes, continue to apply pressure on the wound while transporting the dog to the veterinarian.

Step 8: Wrap torn rags or other soft material around the dressing and tie or tape it just tightly enough to keep the bandage on. Start below the wound and wrap upward.

Step 9: If the wound is deep enough to require stitches, keep the dog off the injured leg, and immediately transport your pet to the veterinarian.

Dog's Bleeding Chest or Abdomen

Step 1: Restrain the dog if necessary.

Step 1a: Approach the dog slowly, speaking in a reassuring tone of voice.

Step 1b: Muzzle the dog to protect yourself.

Step 2: If the wound is in the chest and a "sucking" noise is heard, bandage the wound tightly enough to keep air from entering, and transport the dog immediately to the veterinarian. If not, proceed to Step 3.

©2006 Publications International, Ltd. Step 3

Step 3: If there is a protruding object, such as an arrow, DO NOT attempt to remove the object. If not, proceed to Step 4.

Step 3a: Place clean cloths, sterile dressings, or sanitary napkins around the point of entry.

Step 3b: Bandage tightly around the point of entry.

Step 3c: Transport the dog immediately to the veterinarian.

Step 4: Clip the hair around the injured area.

Step 5: Examine the wound for glass or other foreign objects. If visible, remove the object with your fingers or a pair of tweezers. If the tissue under the wound appears to pass by when you move the skin, the wound will probably require stitches.

Step 6: Flush the wound thoroughly with clean water.

Step 7: Cover the wound with a clean cloth, sterile dressing, or sanitary napkin.

©2006 Publications International, Ltd. Step 10

Step 8: Place your hand over the dressing and press firmly.

Step 9: Keep pressure on the dressing to stop the bleeding. If blood soaks through the dressing, DO NOT remove it. Apply more dressing and continue to apply pressure until the bleeding stops.

Step 10: Wrap torn sheets or other soft material around the dressing and tie or tape it just tightly enough to keep the bandage on.

Step 11: If the wound is deep enough to require stitches, transport the dog immediately to the veterinarian.

Dog's Bleeding Ear

Step 1: Restrain the dog if necessary.

©2006 Publications International, Ltd. Step 2

Step 1a: Approach the dog slowly, speaking in a reassuring tone of voice.

Step 1b: Muzzle the dog to protect yourself.

Step 2: Cover the wound with a clean cloth, sterile dressing, or sanitary napkin. Place dressing material on both sides of the ear flap, then fold it over the top of the dog's head and hold firmly to control bleeding.

Step 3: Wrap torn sheets or rags around the dressing, ear, and head, making sure the entire ear is covered. Tape or tie the bandage in place.

Step 4: Transport the dog immediately to the veterinarian.

Dog's Bleeding Nails

A broken nail or one that is cut too short are the most common reasons for a bleeding nail. Be sure to bring your dog to the groomer if you're not comfortable clipping its nails.

If the nail is broken:

Step 1: Restrain the dog if necessary.

Step 1a: Approach the dog slowly, speaking in a reassuring tone of voice.

©2006 Publications International, Ltd. Step 3

Step 2: DO NOT try to cut or remove the broken nail without muzzling the dog.

Step 3: Hold a clean cloth, sterile dressing, or sanitary napkin against the nail. The bleeding will stop in a few minutes.

Step 4: Transport the dog to the veterinarian as soon as possible.

If the nail is cut too short:

Step 1: Restrain the dog if necessary.

Step 1a: Approach the dog slowly, speaking in a reassuring tone of voice.

Step 1b: Slip a leash around the dog's neck, then place the leash around a fixed object. Pull the dog against this object and tie the leash so the dog cannot move its head.

Step 1c: Muzzle the dog to protect yourself.

Step 2: Hold a clean cloth, sterile dressing, or sanitary napkin against the nail.

Step 3: Keep firm pressure on the area for at least 5 minutes. DO NOT remove the bandage until the bleeding stops.

Step 4: If the bleeding does not stop in 15 to 20 minutes, transport the dog to the veterinarian as soon as possible. Continuous bleeding indicates a bleeding disorder that should be treated promptly.

Internal Bleeding

Internal bleeding is always an emergency. The signs of internal bleeding are pale or white gums; rapid heartbeat or breathing; and bleeding from the ears, nose, mouth, or rectum. The following steps will help you treat the dog for any potential shock, and transport the dog to professional help immediately.

Step 1: If there is bleeding from any external wounds, treat for shock.

Step 1a: Examine the gums by gently lifting the upper lip so the gum is visible. Pale or white gums indicate the dog is almost certainly in shock and may have serious internal injuries and/or bleeding. If the gums are pink, the dog is probably not in shock.

Step 1b: Determine the heartbeat. Place your fingers firmly on the dog about 2 inches behind the dog's elbow in the center of its chest. Count the number of beats in 10 seconds and multiply by 6. If the dog is in shock its heartbeat may be more than 150 beats per minute.

©2006 Publications International, Ltd. Step 3

Step 2: Place the dog on its side with its head extended.

Step 3: Gently pull out the dog's tongue to keep the airway open.

Step 4: Elevate the dog's hindquarters slightly by placing them on a pillow or folded towels.

Step 5: To conserve body heat, wrap the dog in a blanket or jacket.

Step 6: Transport the dog immediately to the veterinarian.

Bloating is a serious condition that can cause sudden death to a dog. In the next section, we'll discuss the signs of bloating and what to do if you suspect your pet is suffering from it.

How to Treat a Bloated Dog

©2006 Publications International, Ltd.

It is hard to accept the fact that a seemingly healthy dog can, within an hour, be fighting for its life. Bloat is an extremely serious, potentially fatal condition. Professional treatment is urgent and should not be delayed.

Bloat seems to affect large, deep-chested dogs more than other breeds. The symptoms are dramatic and unmistakable and include excessive drooling, pacing, and agitation; an enlarged abdomen; and frequent attempts to vomit, which produces large amounts of white foam or nothing at all.

Advertisement

There is no satisfactory scientific explanation as to why bloat occurs. Basically, the stomach fills with gas, like a blown-up balloon. But with the balloon there is room for expansion. With the stomach there is none, so the gas places pressure on the spleen, liver, and other internal organs.

If you suspect your pet is suffering from bloat, transport the dog immediately to the veterinarian. Bloat is frequently followed by gastric torsion (turning of the stomach), which leads to shock and death in a matter of a few hours.

To prevent bloat and subsequent torsion, feed the dog small meals several times a day rather than one large meal, and see that heavy exercise is avoided after meals.

Check the next section for advice on what to do if your pet has a broken leg, including how to attach a splint.

How to Treat a Dog With a Broken Leg

©2006 Publications International, Ltd. Step 2

With dogs, as with human beings, all bones are subject to breakage, but leg fractures are by far the most common. It is important to remember that dogs have a high pain tolerance and often a dangling leg seems to cause no pain. Therefore, don't be afraid to handle the fractured limb (but be gentle!). The dog will let you know if it hurts.

Some signs to look for include a leg that looks misshapen, hangs limply, cannot support body weight, and is swollen. Also watch out for signs of shock, which include pale or white gums, a rapid heartbeat, or rapid breathing.

Advertisement

To provide proper care for your dog's broken bone, use the following tips.

Step 1: Restrain the dog if necessary.

Step 1a: Approach the dog slowly, speaking in a reassuring tone of voice.

Step 1b: Slip a leash around the dog's neck, then place the leash around a fixed object. Pull the dog against this object and tie the leash so the dog cannot move its head.

Step 1c: Muzzle the dog to protect yourself.

Step 2: Examine the leg and determine if the fracture is open (wound near the break or bone protruding from the skin) or closed (no break in the skin).

©2006 Publications International, Ltd. Step 3c

Step 3: If the fracture is closed, proceed to Step 4. If the fracture is open:

Step 3a: Flush the wound thoroughly with clean water.

Step 3b: Cover the wound with a sterile bandage, clean cloth, or sanitary napkin.

Step 3c: DO NOT attempt to splint the fracture. Hold a large folded towel under the unsplinted limb and transport the dog immediately to the veterinarian.

Step 4: If the broken limb is grossly misshapen or the dog appears to be in great pain when you attempt to splint, stop and proceed to Step 5. Otherwise, proceed to splint the bone.

Step 4a: Use any splint material available -- sticks, newspaper, magazine, or stiff cardboard. The object is to immobilize the limb not reset it.

©2006 Publications International, Ltd. Step 4b

Step 4b: Attach the splints to the fractured leg with torn strips of cloth or gauze.

Step 4c: Tape or tie the strips firmly but not so tightly that circulation may be impaired.

Step 4d: Transport the dog immediately to the veterinarian.

Step 5: If the broken limb is grossly misshapen or the dog appears to be in great pain when you attempt to splint, hold a large towel under the unsplinted limb for support and transport the dog immediately to the veterinarian.

Be prepared for burn injuries to your pet by checking the tips in the next section.

How to Treat a Burned Dog

©2006 Publications International, Ltd. Step 2

Dogs just love being underfoot while their owners are cooking. While this can be an admirable trait of man's best friend, it can also be dangerous when boiling water or hot cooking oil is being used in the kitchen.

A dog may experience first-, second-, or third-degree burns that are caused by fire, heat, boiling liquids, chemicals, and electricity. All are painful and can cause damage, even death. Superficial burns, evidenced by pain and reddening of the skin, are usually not serious. However, first aid should be given as soon as possible to ease the pain.

Advertisement

The following tips will help you not only identify the type of burn you're dealing with but will also give you suggestions on how to best treat the injury.

First- or Second-Degree Burns

The signs of a first-degree burn include fur intact or singed, painful lesions, or red skin with possible blisters. The signs of a second-degree burn are singed fur or painful lesions that turn tan in color with swelling and blisters. If you notice any of these warning signs, here's what to do:

Step 1: Restrain the dog if necessary.

.

Step 2: Apply cold water or ice packs to the burned area and leave in contact with the skin for 15 minutes. DO NOT apply ointment or butter.

Step 3: If burns cover a large part of the dog's body or are located where the dog can lick them, cover the area with a sterile dressing. DO NOT use cotton.

Step 4: Wrap torn rags or other soft material around the dressing and tie or tape it just tightly enough to keep it in place.

Step 5: Transport the dog to the veterinarian as soon as possible.

Third-Degree Burns

The signs of a third-degree burn include destruction on entire skin area, black or pure white lesions, or fur that pulls out easily. Also watch for signs of shock, which include pale or white gums, a rapid heartbeat, or rapid breathing. If you notice these signs, here's what to do:

Step 1: Restrain the dog if necessary.

Step 1a: Approach the dog slowly, speaking in a reassuring tone of voice.

Step 2: Examine the dog for shock. If he or she is not in shock, proceed to Step 3.

Step 2a: Examine the gums by gently lifting the upper lip so the gum is visible. Pale or white gums indicate the dog is almost certainly in shock. If the gums are pink, the dog is probably not in shock.

Step 2b: Determine the heartbeat. Place fingers firmly on the dog about 2 inches behind the dog's elbow in the center of its chest. Count the number of beats in 10 seconds and multiply by 6. If the dog is in shock its heartbeat may be more than 150 beats per minute.

Step 2c: Place the dog on its side with its head extended. Gently pull out the dog's tongue to keep the airway open.

Step 2d: Elevate the dog's hindquarters slightly by placing them on a pillow or folded towels. To conserve body heat, wrap the dog in a blanket or jacket.

Step 3: DO NOT apply ointment or butter. Apply a dry, clean dressing over the burned area. DO NOT use cotton.

Step 4: Wrap torn rags or other soft material around the dressing and tie or tape it just tightly enough to keep it in place.

Step 5: Transport the dog to the veterinarian as soon as possible.

Chemical Burns

The signs of a chemical burn include a chemical odor such as turpentine, gasoline, or insecticide; reddened skin; or pain. If you notice these signs, do the following:

©2006 Publications International, Ltd. Step 2

Step 1: Restrain the dog if necessary.

Step 1a: Approach the dog slowly, speaking in a reassuring tone of voice.

Step 2: Wash the area thoroughly with soap and water; repeat as many times as necessary to remove the chemical. Use mild soap and lather well. DO NOT use solvents of any kind.

Step 3: Call the veterinarian for further instructions.

Does your dog get into anything and everything? Check the next section for first-aid tips on treating a choking dog, including how to clear the airway and administer CPR.

How to Treat a Choking Dog

©2006 Publications International, Ltd. Step 2d

When a dog is choking on a foreign object, it needs help at once. The harder it tries to breathe, the more panicky it becomes. Your goal in this emergency situation is to open the dog's airway without being bitten.

The signs that a dog is choking include pawing at the mouth, a pale or blue tongue, obvious distress, or unconsciousness. If the dog is unconscious and you believe a foreign object is present, you must open the airway before giving the dog cardiopulmonary resuscitation (CPR). If the dog cannot breathe, efforts to revive it will be fruitless.

Advertisement

While all this sounds quite overwhelming, you can help a choking or unconscious dog by following the basic tips outlined below. Your efforts may save a dog's life!

Step 1: Restrain the dog if necessary.

Step 1a: Approach the dog slowly, speaking in a reassuring tone of voice.

Step 2: Clear the airway.

Step 2a: Open the dog's mouth carefully by grasping the upper jaw with one hand over the muzzle.

Step 2b: Press the dog's lips over the upper teeth by pressing your thumb on one side and your fingers on the other so that the lips are between the dog's teeth and your fingers. Apply firm pressure to force the mouth open.

Step 2c: If you can see the object, try to remove it with your fingers.

Step 2d: If you cannot remove the object and the dog is small enough, pick it up by grasping its back legs; turn it upside down and shake vigorously. Slapping its back while shaking may help to dislodge the object.

Step 2e: If you cannot remove the object and the dog is too large to pick up, place the dog on its side on the floor. Place your hand just behind the rib cage and press down and slightly forward quickly and firmly. Release. Repeat rapidly several times until the object is expelled.

Step 3: If you cannot dislodge the object, transport the dog immediately to the veterinarian.

Step 4: If you dislodge the object and the dog is not breathing, feel for a heartbeat by placing your fingers about 2 inches behind the dog's elbow in the middle of its chest.

Step 5: If the dog's heart is not beating, proceed to Step 6. If it is, perform artificial respiration.

©2006 Publications International, Ltd. Step 5b

Step 5a: Turn the dog on its side.

Step 5b: Extend the dog's head and neck. Hold the dog's mouth and lips closed and blow firmly into its nostrils. Administer 1 breath every 3 to 5 seconds. Take a deep breath, and repeat until you feel resistance or see the chest rise.

Step 5c: After 10 seconds, stop. Watch the chest for movement to indicate the dog is breathing on its own.

Step 5d: If the dog is not breathing, continue artificial respiration.

Step 6: If the heart is not beating, perform CPR.

CPR for Dogs Weighing up to 45 Pounds

Step 6a: Turn the dog on its back.

©2006 Publications International, Ltd. Step 6c

Step 6b: Kneel down at the head of the dog.

Step 6c: Clasp your hands over the dog's chest with your palms resting on either side of its chest.

Step 6d: Compress your palms on the chest firmly for a count of "2," and release for a count of "1." Moderate pressure is required. Repeat about 60 to 90 times per minute.

Step 6e: Alternately (after 30 seconds), hold the dog's mouth and lips closed and blow firmly into its nostrils. Blow for 3 seconds, take a deep breath, and repeat until you feel resistance or see the dog's chest rise. Try to repeat this 10 to 20 times per minute. As a general rule, use a CPR ratio of about 5 heart compressions to 1 breath of air.

Step 6f: After 1 minute, stop. Look at the chest for breathing movement, and feel for a heartbeat by placing fingers about 2 inches behind the dog's elbow in the center of its chest.

Step 6g: If the dog's heart is not beating, continue CPR. If the heart starts beating, but the dog is still not breathing, return to Step 5.

CPR for Dogs Weighing More Than 45 Pounds

©2006 Publications International, Ltd. Step 6b

Step 6a: Turn the dog on its side.

Step 6b: Place the palm of your hand in the middle of the dog's chest.

Step 6c: Press for a count of "2," and release for a count of "1." Firm pressure is required. Repeat about 60 to 90 times per minute.

Step 6d: Alternately (after 30 seconds), hold the dog's mouth and lips closed and blow firmly into its nostrils. Blow for 3 seconds, take a deep breath, and repeat until you feel resistance or see the chest rise. Try to repeat this 10 to 20 times per minute.

Step 6e: After 1 minute, stop. Look at the chest for breathing movement, and feel for a heartbeat by placing your fingers about 2 inches behind the dog's elbow in the center of its chest.

Step 6f: If the dog's heart is not beating, continue CPR. If the heart starts beating but the dog is still not breathing, return to Step 5.

Step 7: Transport the dog immediately to the veterinarian. CPR or artificial respiration should be continued on the way to the veterinarian or until dog is breathing and its heart is beating without assistance.

Witnessing a seizure can be a scary thing, but don't panic. Use the tips on the next page to help you if your pet experiences convulsions or seizures.

How to Treat a Dog That Has Convulsions/Seizures

A female veterinarian giving drops of essential oil to a cat.
A seizure can be fatal to a cat. CasarsaGuru / Getty Images

A convulsion or seizure is the result of constant electrical firing of the muscles of the body from the brain. Convulsions are rarely fatal, and most last only a few minutes. A typical seizure is then followed by 15 minutes to a half hour of recovery time, during which period the dog may be dazed and confused.

Not all seizures are due to epilepsy. Some are caused by lead or other poisons, liver diseases, and even brain tumors. Seizures or convulsions should never be taken lightly. The problem should be discussed with your veterinarian as soon as possible.

Advertisement

The most important thing to do if your dog is experiencing a seizure is to protect it from self-injury. Be patient, don't panic, and use the following tips to provide proper care.

Step 1: DO NOT place your fingers or any object in the dog's mouth.

Step 2: Pull the dog away from walls and furniture to prevent self-injury.

Step 3: Seizures can raise your dog's body temperature fast, so don't wrap the dog in a blanket or towel for comfort until the seizure is over. Instead, place cool washcloths on his feet to help keep his temperature from rising.

Step 4: After the seizure has stopped, contact your veterinarian for further instructions. You can now wrap your dog in a towel or blanket to comfort him after the seizure he's alert.

Step 5: If you're able to, time your dog's seizure. If it lasts less than 2 minutes, he should be OK but you should still consult with your veterinarian. If it lasts between 2 and 5 minutes, this is starting to hit the warning zone and you dog should take your dog to the vet as soon as possible. If the seizure lasts longer than 5 minutes, he needs to be treated by your veterinarian immediately.

A common ailment among most pets, diarrhea can become a serious problem if not treated properly. Turn to the next section for helpful tips.

How to Treat a Dog That Has Diarrhea

Diarrhea is a commonly encountered problem that occurs when food is passed through a dog's intestine too rapidly. It can be caused by allergies, milk, parasites, spoiled food, or bacterial infection. There are also more serious causes such as tumors; viral infections; and diseases of the liver, pancreas, and kidney.

Be sure to seek professional help if blood, severe depression, or abdominal pain are present in your pet. Otherwise, use the following suggestions to help ease a dog's discomfort.

Advertisement

Step 1: Remove all food for 12 to 24 hours. Water is important to prevent dehydration in severe diarrhea. It should not be removed.

Step 2: If blood appears or if diarrhea continues for more than 24 hours, contact the veterinarian. He or she will probably want to see a stool sample.

Step 3: After at least 12 hours, treat the dog by feeding it a bland diet such as boiled skinless chicken and rice (50:50 mixture). When stools begin to form, slowly phase back to regular diet. Kaopectate or Pepto-Bismol can be safely used in dogs. Call your veterinarian for the correct dosage for your pet.

When people think of animal bites, they usually think of a human being bit by a dog. But dogs can also be the victims of bites from dogs or other animals lurking in the backyard. Check the next section for first-aid tips when your dog experiences an animal bite.

How to Treat a Dog With an Animal Bite

©2006 Publications International, Ltd. Step 2

When a dog gets into a fight with another dog, a cat, or a wild animal, damage can occur to both the skin and the underlying tissue. Many dogfights can be avoided by not permitting your dog to run loose and by keeping it on a leash when you walk it. The dog should also be trained to obey your commands.

If your dog does get into a fight, do not try to break it up with your bare hands. A fighting dog will bite anything in its way, including you. Pull your leashed dog out of harm's way or use a long stick. After the fight is over, examine your dog carefully for hidden wounds. You'll often find punctures around the neck area and on the legs. Look through the hair carefully to find bloodstains, which would indicate the skin has been punctured.

Advertisement

It is important to determine if the biting animal has been inoculated against rabies. If the biter is a wild animal such as a skunk or raccoon, efforts should be made to destroy it so the brain can be examined for rabies. Never touch the wild animal with your bare hands, even after it has been killed. Wear gloves or wrap the body in a blanket. Your veterinarian will take care of the rabies examination.

To provide proper care to a dog suffering from an animal bite, use the following tips.

Step 1: Restrain the dog if necessary.

Step 1a: Approach the dog slowly, speaking in a reassuring tone of voice.

Step 1b: Slip a leash around the dog's neck, then place the leash around a fixed object. Pull the dog against this object and tie the leash so the dog cannot move its head.

Step 1c: Muzzle the dog to protect yourself.

Step 2: Clip the hair around the wound.

Step 3: Flush the wound thoroughly with clean water. Avoid home antiseptics, which may cause pain when applied.

Step 4: Examine the wound. If the tissue under the wound appears to pass by when you move the skin, the wound will probably require stitches.

©2006 Publications International, Ltd. Step 3

Step 5: DO NOT bandage. Allow the wound to drain unless there is excessive bleeding. If the wound does bleed excessively, follow these steps:

Step 5a: Cover wound with clean cloth, sterile dressing, or sanitary napkin.

Step 5b: Place your hand over the dressing and press firmly.

Step 5c: Keep pressure on the dressing to stop the bleeding.

Step 5d: If blood soaks through the dressing, DO NOT remove it. Apply more dressing and continue to apply pressure until the bleeding stops.

Step 6: If the wound is deep enough to require stitches, transport the dog immediately to the veterinarian.

Step 7: Be sure to contact your veterinarian if your dog is not current on its rabies vaccination.

Dogs are natural swimmers, but situations can occur where a dog swims too far and starts drowning. Turn to the next section to find out how to best handle this type of emergency.

How to Save a Drowning Dog

©2006 Publications International, Ltd. Step 1a

Dogs are naturally good swimmers for short distances, but they can get into trouble. Sometimes they get too far from the shore and tire trying to swim back, or they fall into a swimming pool and cannot get up the steep sides.

Always protect yourself when trying to rescue a drowning dog. An extra few moments of preparation can save two lives -- yours and the dog's. Also be sure to watch for signs of shock, which include pale or white gums, a rapid heartbeat, or rapid breathing. Use the following tips when rescuing a drowning dog.

Advertisement

Step 1: Rescue the dog.

Step 1a: Holding the attached rope, throw a life preserver toward the dog. OR

Step 1b: Try to hook the dog's collar with a pole. OR

Step 1c: Row out to the dog in a boat. OR

Step 1d: As a last resort, swim to the dog. Protect yourself. Bring something for the dog to cling to or climb on and be pulled to shore.

Step 2: Drain the dog's lungs.

Step 2a: If you can lift the dog, grasp the rear legs and hold the animal upside down for 15 to 20 seconds. Give 3 or 4 downward shakes to help drain fluid from its lungs.

©2006 Publications International, Ltd. Step 2a

Step 2b: If you cannot lift the dog, place it on a sloping surface with its head low to facilitate drainage.

Step 3: If the dog is not breathing, feel for a heartbeat by placing your fingers about 2 inches behind the dog's elbow in the middle of its chest.

Step 4: If the heart is not beating, proceed to Step 5. If it is, perform artificial respiration.

Step 4a: Turn the dog on its side.

Step 4b: Extend the dog's head and neck. Hold the dog's mouth and lips closed and blow firmly into its nostrils. Administer 1 breath every 3 to 5 seconds. Take a deep breath, and repeat until you feel resistance or see the chest rise.

Step 4c: After 10 seconds, stop. Watch the dog's chest for movement to indicate it is breathing on its own.

Step 4d: If the dog is not breathing, continue artificial respiration.

Step 5: If the heart is not beating, perform cardiopulmonary resuscitation (CPR).

CPR for Dogs Weighing up to 45 Pounds

Step 5a: Turn the dog on its back.

Step 5b: Kneel down at the head of the dog.

Step 5c: Clasp your hands over the dog's chest with your palms resting on either side of its chest.

Step 5d: Compress your palms on the chest firmly for a count of "2," and release for a count of "1." Moderate pressure is required. Repeat about 60 to 90 times per minute.

©2006 Publications International, Ltd. Step 5f

Step 5e: Alternately (after 30 seconds), hold the dog's mouth and lips closed and blow firmly into its nostrils. Blow for 3 seconds, take a deep breath, and repeat until you feel resistance or see the dog's chest rise. Try to repeat this 10 to 20 times per minute. As a general rule, use a CPR ratio of about 5 heart compressions to 1 breath of air.

Step 5f: After 1 minute, stop. Look at the chest for breathing movement, and feel for a heartbeat by placing fingers about 2 inches behind the dog's elbow in the center of its chest.

Step 5g: If the dog's heart is not beating, continue CPR. If the heart starts beating, but the dog is still not breathing, return to Step 4.

CPR for Dogs Weighing More Than 45 Pounds

Step 5a: Turn the dog on its side.

Step 5b: Place the palm of your hand in the middle of the dog's chest.

©2006 Publications International, Ltd. Step 5b

Step 5c: Press for a count of "2," and release for a count of "1." Firm pressure is required. Repeat about 60 to 90 times per minute.

Step 5d: Alternately (after 30 seconds), hold the dog's mouth and lips closed and blow firmly into its nostrils. Blow for 3 seconds, take a deep breath, and repeat until you feel resistance or see the chest rise. Try to repeat this 10 to 20 times per minute.

Step 5e: After 1 minute, stop. Look at the chest for breathing movement, and feel for a heartbeat by placing your fingers about 2 inches behind the dog's elbow in the center of its chest.

Step 5f: If the dog's heart is not beating, continue CPR. If the heart starts beating but the dog is still not breathing, return to Step 4.

Step 6: Transport the dog immediately to the veterinarian. CPR or artificial respiration should be continued until the dog is breathing and its heart is beating without assistance.

Puppies love to chew -- and they rarely discriminate between what they chew and what they avoid. If your puppy gets a hold of an electrical cord, you may be faced with treating electrical shock. Check the next section for tips on dealing with this type of pet emergency.

How to Treat a Dog in Electrical Shock

©2006 Publications International, Ltd. Step 1

Grown dogs are seldom victims of electrical shock. But puppies are naturally curious and will chew almost anything, including electrical cords. If the insulation is punctured and the mouth comes in contact with both wires, the dog will receive a shock and may be unable to release the cord.

Electrocution can cause severe heart damage and fluid accumulation in the lungs. Strong shock can stop the heart, and CPR will need to be performed immediately to start the heart beating again. In addition, the dog's mouth will likely be burned from contact with the bare wires. Be sure to watch for signs of shock, which include pale or white gums, a rapid heartbeat, or rapid breathing.

Advertisement

To provide the proper care for your pet who is suffering from electrical shock, use the following tips.

Step 1: If the dog still has the electrical cord in its mouth, DO NOT touch the dog. First remove the plug from its outlet.

Step 2: If the dog is unconscious, check for breathing. If the dog is conscious and breathing, proceed to Step 6. If the dog is not breathing, feel for a heartbeat by placing your fingers about 2 inches behind the elbow in the middle of its chest.

Step 3: If the heart is not beating, proceed to Step 4. If it is, perform artificial respiration.

Step 3a: Turn the dog on its side, and extend its head and neck.

©2006 Publications International, Ltd. Step 2

Step 3b: Hold the dog's mouth and lips closed and blow firmly into its nostrils. Administer 1 breath every 3 to 5 seconds. Take a deep breath, and repeat until you feel resistance or see the chest rise.

Step 3c: After 10 seconds, stop. Watch the dog's chest for movement to indicate the dog is breathing on its own.

Step 3d: If the dog is not breathing, continue artificial respiration.

Step 4: If the heart is not beating, perform CPR.

CPR for Dogs Weighing up to 45 Pounds

Step 4a: Turn the dog on its back.

Step 4b: Kneel down at the head of the dog.

©2006 Publications International, Ltd. Step 4c

Step 4c: Clasp your hands over the dog's chest with your palms resting on either side of its chest.

Step 4d: Compress your palms on the chest firmly for a count of "2," and release for a count of "1." Moderate pressure is required. Repeat about 60 to 90 times per minute.

Step 4e: Alternately (after 30 seconds), hold the dog's mouth and lips closed and blow firmly into its nostrils. Blow for 3 seconds, take a deep breath, and repeat until you feel resistance or see the dog's chest rise. Try to repeat this 10 to 20 times per minute. As a general rule, use a CPR ratio of about 5 heart compressions to 1 breath of air.

Step 4f: After 1 minute, stop. Look at the chest for breathing movement, and feel for a heartbeat by placing fingers about 2 inches behind the dog's elbow in the center of its chest.

Step 4g: If the dog's heart is not beating, continue CPR. If the heart starts beating, but the dog is still not breathing, return to Step 3.

CPR for Dogs Weighing More Than 45 Pounds

Step 4a: Turn the dog on its side.

Step 4b: Place the palm of your hand in the middle of the dog's chest.

©2006 Publications International, Ltd. Step 4b

Step 4c: Press for a count of "2," and release for a count of "1." Firm pressure is required. Repeat about 60 to 90 times per minute.

Step 4d: Alternately (after 30 seconds), hold the dog's mouth and lips closed and blow firmly into its nostrils. Blow for 3 seconds, take a deep breath, and repeat until you feel resistance or see the chest rise. Try to repeat this 10 to 20 times per minute.

Step 4e: After 1 minute, stop. Look at the chest for breathing movement, and feel for a heartbeat by placing your fingers about 2 inches behind the dog's elbow in the center of its chest.

Step 4f: If the dog's heart is not beating, continue CPR. If the heart starts beating but the dog is still not breathing, return to Step 3.

Step 5: Transport the dog immediately to the veterinarian. CPR or artificial respiration should be continued until the dog is breathing and its heart is beating without assistance.

Step 6: If the dog's mouth or lips are burned (bright red), swab them gently with 3% hydrogen peroxide.

Step 7: To conserve body heat, wrap the dog in a blanket or jacket.

Just like humans, dogs often have problems with their eyes due to dust, allergies, and other culprits. See the next page for tips on dealing with eye injuries.

How to Treat a Dog With Eye Injuries

©2006 Publications International, Ltd. Step 3a

Irritation of the eye in a dog can be caused by allergies, dust and dirt, lashes growing inward, fights, and more. It can result in a mild inflammation of the tissue around the eye (conjunctivitis) or severe damage to the cornea.

When examining a dog's eye, it is important to know that dogs have a third eyelid located in the corner of the eye nearest the nose. This third eyelid can completely cover the eyeball and sometimes gives the appearance that part of the eye is gone.

Advertisement

In addition to being a protective mechanism, the third eyelid can indicate that something is wrong with the eye. If it is raised and looks red, the eye is inflamed. Do not try to touch or manipulate this eyelid.

Other indications that a dog's eye is irritated are squinting and rubbing and pawing at the eye. Your first priority is to prevent your pet from further injuring itself since this often causes more severe damage than the original irritation. Use the following tips to treat your dog's eye injuries.

Object in the Eye

Step 1: DO NOT try to remove the object.

Step 2: Restrain the dog if necessary.

Step 2a: Approach the dog slowly, speaking in a reassuring tone of voice.

Step 3: Prevent self-injury to the eye.

Step 3a: Dewclaws (if present) should be bandaged on the front paw on the same side as the affected eye.

Step 3b: For small dogs, cut a large piece of cardboard into an Elizabethan-type collar.

©2006 Publications International, Ltd. Step 3b

Step 3c: For larger dogs, cut the bottom from a plastic bucket, fit the bucket over the dog's head, and hold it in place by tying it to the dog's collar.

Step 4: Transport the dog immediately to the veterinarian.

Scratched or Irritated Eye

The typical signs of a scratched or irritated eye include squinting; rubbing or pawing at the eyes; or thick discharge or redness in the eye.

Step 1: Restrain the dog if necessary.

Step 1a: Approach the dog slowly, speaking in a reassuring tone of voice.

Step 2: Flush the dog's eye thoroughly with saline solution or plain water.

©2006 Publications International, Ltd. Step 3c

Step 3: Prevent self-injury to the eye.

Step 3a: Dewclaws (if present) should be bandaged on the front paw on the same side as the affected eye.

Step 3b: For small dogs, cut a large piece of cardboard into an Elizabethan-type collar.

Step 3c: For larger dogs, cut the bottom from a plastic bucket, fit the bucket over the dog's head, and hold it in place by tying it to the dog's collar.

Step 4: Transport the dog immediately to the veterinarian.

A dog can be sensitive to extreme cold, especially its ears and the tip of its tail. If you suspect your pet is suffering from frostbite, take note of the first-aid tips on the next page.

How to Treat a Dog That Has Frostbite

©2006 Publications International, Ltd. Step 2

When a dog is exposed to freezing temperatures for a long period of time, there is always the possibility of frostbite. The signs of frostbite include pain, pale skin in early stages, and red or black skin in advanced stages.

The areas most likely to be frostbitten are those that have little or no hair and the ears and tail tip, which have a limited blood supply. Occasionally, if damage from frostbite is severe, part of the tail or ear tips may actually fall off. Professional attention should be sought before this happens. To provide proper care to a dog suffering from frostbite, use the following tips.

Advertisement

Step 1: Restrain the dog if necessary.

Step 1a: Approach the dog slowly, speaking in a reassuring tone of voice.

Step 1b: Slip a leash around the dog's neck, then place the leash around a fixed object. Pull the dog against this object and tie the leash so the dog cannot move its head.

Step 1c: Muzzle the dog to protect yourself, if necessary.

Step 2: Warm the area with moist towels. The water temperature should be warm but not hot (75 degrees Fahrenheit/24 degrees Celsius). DO NOT use ointment.

Step 3: If the skin turns dark, transport the dog to the veterinarian as soon as possible.

Just as exposure to extreme cold can be harmful to your pet, so, too, can extreme heat. Check the next section to learn how to treat a dog that has heatstroke.

How to Treat a Dog That Has Heatstroke

©2006 Publications International, Ltd. Step 2

Heatstroke is caused by the inability of the body to maintain its normal temperature because of the environmental heat. It is often caused by keeping a dog in a locked car parked in the sun or by keeping it in any hot area without adequate ventilation.

The signs of heatstroke are excessive drooling, lack of coordination, rapid breathing, and a top of the head that is hot to the touch. Prompt treatment is urgent. Body temperatures often get as high as 107 degrees Fahrenheit/41.5 degrees Celsius, and without quick cooling, severe brain damage and death will occur.

Advertisement

Heatstroke can be prevented by making sure your dog has plenty of shade and ventilation. If you must take your dog driving with you, park in the shade and leave all the windows partially open.

Should heatstroke occur, use the following suggestions to help you provide your dog with the utmost care.

Step 1: Remove the dog from the hot environment.

©2006 Publications International, Ltd. Step 3

Step 2: Immerse the dog in a cold water bath or continuously run a garden hose on its body; continue either treatment for at least 30 minutes.

Step 3: Apply ice packs to the top of the head; keep them there while transporting the dog to the veterinarian.

Step 4: Transport the dog to the veterinarian immediately after the above treatment.

Another pet injury that requires immediate professional treatment is hypothermia. Check the next page for tips on what to do if you suspect your pet is suffering from this condition.

How to Treat a Dog That Has Hypothermia

Exposure to either cold water or freezing temperatures can cause hypothermia, or subnormal body temperatures. A dog's survival will depend on how low its body temperature drops.

A dog's normal body temperature is 100 to 101 degrees Fahrenheit/38 degrees Celsius. If it drops below 90 degrees Fahrenheit/32 degrees Celsius for any length of time, normal bodily functions will be severely impaired.

Advertisement

The signs of hypothermia include depression, subnormal body temperature, and coma. This condition always requires veterinary attention as soon as possible. Use the following tips to help you provide proper care to a dog suffering from hypothermia.

Step 1: Warm the dog.

Step 1a: Place a hot water bottle (100 degrees Fahrenheit/37 degrees Celsius) against the dog's abdomen. Wrap the bottle in a cloth to prevent burns. Wrap the dog in a blanket or jacket.

Step 2: Transport the dog immediately to the veterinarian.

Just like humans, dogs can be allergic to insect bites, so it's important to know the warning signs. Learn more about treating insect stings on the next page.

How to Treat a Dog With an Insect Bite or Sting

©2006 Publications International, Ltd. Step 2

While most insect bites to a dogwill be uneventful, if your pet has been stung by a bee, wasp, yellow jacket, or hornet, the area will quickly become swollen and somewhat painful. A possible allergic reaction to the venom deposited by the insect is the most serious problem.

The signs of an insect bite include swelling, pain in the muscles and affected area, vomiting, weakness, fever, and shock. The signs of shock are pale or white gums, a rapid heartbeat, or rapid breathing. Below are helpful suggestions on what to do if your pet has been stung by a pest.

Advertisement

Step 1: Restrain the dog if necessary.

Step 1a: Approach the dog slowly, speaking in a reassuring tone of voice.

Step 1b: Muzzle the dog to protect yourself, if necessary.

Step 2: DO NOT pinch the area. If the dog has been stung by a bee, scrape the stinger off immediately with a credit card or dull knife. Other insects do not leave the stinger in the skin.

Step 3: If the affected area is swollen and hot, apply cortisone cream and hold ice on the dog's skin for a short time.

Step 4: Administer antihistamine such as diphenhydramine (Benadryl) orally at a dose of 1mg per pound of body weight (e.g., a 25-pound dog would get 25mg pill or capsule).

Step 5: If the dog experiences any difficulty breathing or if its face seems swollen, transport the dog immediately to the veterinarian.

Did you know your house is filled with products that are poisonous to your beloved pet? Check the next page to find out what they are and what to do if your dog gets a hold of one of these harmful substances.

How to Treat a Poisoned Dog

Dogs are curious creatures and like to investigate, which leads to many accidental poisonings each year. Often a dog will find an open can or bottle of some chemical and, accidentally or on purpose, spill it. Naturally the chemical gets on its fur and paws, and while licking the area clean, it swallows the possibly toxic substance. It is your responsibility as a pet owner to keep all potentially toxic products tightly closed and out of your dog's reach.

Some of the signs of a possible poisoning include excessive drooling, vomiting, diarrhea, abdominal pain, twitching, nervousness, convulsions, coma, and a chemical odor on the body. Here's what you can do if your dog is poisoned:

Advertisement

Step 1: If the dog is comatose or convulsing, wrap it in a blanket and transport your pet immediately to the veterinarian with the suspect poison container, plant, or leaf.

Step 2: If the dog has a chemical odor on its skin, wash the entire dog with mild soap until the odor is gone. If the poison was licked or ingested, flushing the dog's mouth with clean water may also help in decontamination.

Step 3: If the dog has not already vomited and the poison is not a caustic or petroleum product (see lists below), induce vomiting by giving 1 tablespoon of 3% hydrogen peroxide per 20 pounds every 10 minutes until vomiting starts. If no vomiting occurs within 30 minutes, transport the dog immediately to the veterinarian with the suspected poison container.

Step 4: Call the Pet Poison Control hotline for further instructions at 888-426-4435. (There is a charge for this service.)

Caustics include battery acid, corn and callous remover, dishwashing detergent, drain cleaner, grease remover, lye, and oven cleaner. Petroleum products include paint solvent, floor wax, and dry-cleaning solution.

You might be surprised by the number of household items that are poisonous to your dog. Some of the most common are alcoholic beverages, ammonia, antifreeze, bleach, chocolate (baking chocolate is the worst), detergents, disinfectants, dry-cleaning solution, fertilizer, furniture polish, gasoline, glue, grapes and raisins, human medications, mothballs, mouse and rat poison, onions, oven cleaners, paint thinner and remover, shoe polish, silver polish, and toilet bowl cleaner.

In addition, some household plants are toxic to your pet, including aloe vera, amaryllis, avocado, azalea, bird of paradise, calla lily, castor bean, corn plant, cyclamen, daffodil, day lily, dieffenbachia, Easter lily, elephant ears, English ivy, gladiolus, holly, hyacinth, hydrangea, iris, kalanchoe, macadamia nut, mistletoe, narcissus, onion, philodendron, poinsettia, rhododendron, tomato plant, tulip, yew, and yucca.

(This is only a partial list. For a more complete listing, refer to the ASPCA Animal Poison Center at www.aspca.org.)

Dogs can also become poisoned from smoke or carbon monoxide. Check the next section for tips on what to do in this first-aid emergency.

How to Treat a Dog That Has Smoke or Carbon Monoxide Inhalation

©2006 Publications International, Ltd. Step 2

Fires are another possible threat to dogs. Do not risk your own life to save your dog. Leave that task to the firefighters or those trained in rescue.

The signs of smoke or carbon monoxide inhalation include depression, lack of coordination, heavy panting, deep red gums, and possible convulsions. Also watch for signs of shock, which are pale or white gums, a rapid heartbeat, or rapid breathing.

Advertisement

If suspect your pet is suffering from smoke or carbon monoxide inhalation, use the following tips to provide the dog with proper care.

If the Dog Is Conscious

Step 1: Remove the dog from the area and into fresh air immediately.

Step 2: Flush the dog's eyes thoroughly with saline solution or clean water.

Step 3: Transport the dog immediately to the veterinarian.

If the Dog Is Unconscious

Step 1: Remove the dog from the area and into fresh air immediately.

Step 2: If the dog is not breathing, feel for a heartbeat by placing your fingers about 2 inches behind the dog's elbow in the middle of its chest.

©2006 Publication International, Ltd. Step 2

Step 3: If the heart is not beating, proceed to Step 4. If it is, perform artificial respiration.

Step 3a: Turn the dog on its side.

Step 3b: Hold the dog's mouth and lips closed and blow firmly into its nostrils. Administer 1 breath every 3 to 5 seconds. Take a deep breath, and repeat until you feel resistance or see the dog's chest rise.

Step 3c: After 1 minute, stop. Watch the chest for movement to indicate the dog is breathing on its own.

Step 3d: If the dog is not breathing, continue artificial respiration.

Step 4: If the heart is not beating, perform cardiopulmonary resuscitation (CPR).

CPR for Dogs Weighing up to 45 Pounds

Step 4a: Turn the dog on its back.

Step 4b: Kneel down at the head of the dog.

Step 4c: Clasp your hands over the dog's chest with your palms resting on either side of its chest.

©2006 Publications International, Ltd. Step 4e

Step 4d: Compress your palms on the chest firmly for a count of "2," and release for a count of "1." Moderate pressure is required. Repeat about 60 to 90 times per minute.

Step 4e: Alternately (after 30 seconds), hold the dog's mouth and lips closed and blow firmly into its nostrils. Blow for 3 seconds, take a deep breath, and repeat until you feel resistance or see the dog's chest rise. Try to repeat this 10 to 20 times per minute. As a general rule, use a CPR ratio of about 5 heart compressions to 1 breath of air.

Step 4f: After 1 minute, stop. Look at the chest for breathing movement, and feel for a heartbeat by placing your fingers about 2 inches behind the dog's elbow in the center of its chest.

Step 4g: If the dog's heart is not beating, continue CPR. If the heart starts beating, but the dog is still not breathing, return to Step 3.

CPR for Dogs Weighing More Than 45 Pounds

Step 4a: Turn the dog on its side.

©2006 Publications International, Ltd. Step 4b

Step 4b: Place the palm of your hand in the middle of the dog's chest.

Step 4c: Press for a count of "2," and release for a count of "1." Firm pressure is required. Repeat about 60 to 90 times per minute.

Step 4d: Alternately (after 30 seconds), hold the dog's mouth and lips closed and blow firmly into its nostrils. Blow for 3 seconds, take a deep breath, and repeat until you feel resistance or see the chest rise. Try to repeat this 10 to 20 times per minute.

Step 4e: After 1 minute, stop. Look at the chest for breathing movement, and feel for a heartbeat by placing your fingers about 2 inches behind the dog's elbow in the center of its chest.

Step 4f: If the dog's heart is not beating, continue CPR. If the heart starts beating but the dog is still not breathing, return to Step 3.

Step 5: Transport the dog immediately to the veterinarian. CPR or artificial respiration should be continued on the way to the veterinarian or until the dog is breathing and its heart is beating without assistance.

A puncture wound can be quite painful and traumatic for a dog. In the next section, we'll learn how to treat this type of injury.

How to Help a Dog That Has a Puncture Wound

©2006 Publications International, Ltd. Step 3

A puncture wound on a dog may be difficult to see because it is often covered with hair. Since the most common location for a puncture wound is the bottom of the paw, the first sign may be a limp. Slightly blood-tinged fur is a common sign of a puncture wound on other parts of the body.

If you suspect your dog has a puncture wound, be sure to watch for signs of shock, which include pale or white gums, a rapid heartbeat, or rapid breathing. The following tips will help you treat your wounded pet.

Advertisement

If the Object Is Protruding

Step 1: Restrain the dog if necessary, taking care not to touch the object.

Step 1a: Approach the dog slowly, speaking in a reassuring tone of voice.

Step 1b: Slip a leash around the dog's neck, then place the leash around a fixed object. Pull the dog against this object and tie the leash so the dog cannot move its head.

Step 1c: Muzzle the dog to protect yourself if necessary.

Step 2: DO NOT attempt to remove the object.

Step 3: Place clean cloths, sterile dressings, or sanitary napkins around the point of entry.

Step 4: Bandage tightly around the point of entry.

Step 5: Transport the dog immediately to the veterinarian.

Other Puncture Wounds

©2006 Publications International, Ltd. Step 2

Step 1: Restrain the dog if necessary.

Step 1a: Approach the dog slowly, speaking in a reassuring tone of voice.

Step 2: If the wound is in the chest and a "sucking" noise is heard, bandage tightly enough to seal the wound, and transport the dog immediately to the veterinarian.

Step 3: If the wound is not in the chest, clip the hair around the wound.

©2006 Publications International, Ltd. Step 4

Step 4: Examine the wound carefully for foreign objects. If present, remove the object with tweezers or needle-nose pliers.

Step 5: Flush the wound thoroughly with clean water. Avoid home antiseptics, which may cause pain when applied.

Step 6: DO NOT bandage. Allow the wound to drain unless there is excessive bleeding. If the wound does bleed excessively, follow these steps:

Step 6a: Cover wound with clean cloth, sterile dressing, or sanitary napkin.

Step 6b: Place your hand over the dressing and press firmly.

Step 6c: Keep pressure on the dressing to stop the bleeding.

Step 6d: If blood soaks through the dressing, DO NOT remove it. Apply more dressing and continue to apply pressure until the bleeding stops.

Step 7: If the bleeding does not stop within 5 minutes, continue to apply pressure on the wound while transporting the dog to the veterinarian.

Knowing how to identify the signs of shock and how to treat it will help you in many pet first-aid situations. In the next section, learn about proper care for dogs experiencing shock.

How to Treat a Dog in Shock

©2006 Publications International, Ltd. Step 1a

Shock is extremely serious; it is the No. 1 killer in accidents. Shock is a reaction to heavy internal or external bleeding or any serious injury that "scares" the body; for example, a large wound or amputation with heavy blood loss. The body tries to compensate for the loss by speeding up the heart rate to keep the blood pressure from falling. At the same time the blood vessels that supply the outside of the body narrow. This is to conserve blood so vital organs of the body can continue to receive their normal blood supply.

However, if there is heavy blood loss or other serious injury, the body overreacts and causes a pooling of blood in the internal organs. This can cause death due to a drop in external blood pressure and possible oxygen starvation of the brain.

Advertisement

The signs of shock include pale or white gums, a rapid faint heartbeat, rapid breathing, or below-normal body temperature (feels cold). If your dog is in shock, use the following tips to provide proper first aid.

Step 1: Examine the dog for shock.

Step 1a: Examine the gums by gently lifting the dog's upper lip so the gum is visible. Pale or white gums indicate the dog is almost certainly in shock and may have serious internal injuries and/or bleeding. If the gums are pink, the dog is probably not in shock.

Step 1b: Determine the dog's heartbeat. Place your fingers firmly on the dog about 2 inches behind the dog's elbow in the center of its chest. Count the number of beats in 10 seconds and multiply by 6. If the dog is in shock its heartbeat may be more than 150 beats per minute.

©2006 Publications International, Ltd. Step 3

Step 2: Place the dog on its side with its head extended.

Step 3: Gently pull out the dog's tongue to keep the airway open.

Step 4: Elevate the dog's hindquarters slightly by placing them on a pillow or folded towels.

Step 5: Stop visible bleeding immediately. If blood is spurting and the wound is on the leg or tail, proceed to Step 6.

Step 5a: Cover the wound with a clean cloth, sterile dressing, or sanitary napkin.

©2006 Publications International, Ltd. Step 4

Step 5b: Place your hand over the dressing and press firmly.

Step 5c: Keep pressure on the dressing to stop bleeding. If blood soaks through the dressing, DO NOT remove it. Apply more dressing and continue to apply pressure until the bleeding stops. If bleeding does not stop within 5 minutes, continue to apply pressure on the wound while transporting the dog to the veterinarian.

Step 5d: Wrap torn rags or other soft material around the dressing and tie or tape it just tightly enough to keep the bandage on. Start below the wound and wrap upward.

Step 6: If bleeding does not stop within 5 minutes, transport the dog immediately to the veterinarian.

Step 7: To conserve body heat, wrap the dog in a blanket or jacket.

A dog's encounter with a skunk is not only smelly, but it can also be dangerous, since skunks are a major carrier of rabies. Turn to the next page to find out what to do if your pet has been sprayed by a skunk.

How to Treat a Dog That Has Been Sprayed by a Skunk

©2006 Publications International, Ltd. Step 2

Skunks are one of the major carriers of rabies in North America. Therefore, a dog's encounter with a skunk should be treated as more than just a stinky situation. Use the following suggestions to provide proper care for your pet.

Step 1: Restrain the dog if necessary.

Advertisement

Step 1a: Approach the dog slowly, speaking in a reassuring tone of voice.

Step 1b: Slip a leash around the dog's neck, then place the leash around a fixed object. Pull the dog against this object and tie the leash so the dog cannot move its head.

Step 1c: Muzzle the dog to protect yourself.

Step 2: Flush the dog's eyes with fresh water.

Step 3: Remove and destroy leather collars or harnesses.

Step 4: Bathe the dog thoroughly with soap or shampoo and water. Repeat several times.

©2006 Publications International, Ltd. Step 4

Step 5: Apply plain tomato juice liberally. After several minutes, bathe the dog again with soap or shampoo and water. Time will eventually remove the odor. Skunk odor neutralizers are available.

Step 6: If the skunk is destroyed, take it to the veterinarian for a rabies examination. DO NOT touch the skunk with your bare hands.

Step 7: If the dog is not currently vaccinated for rabies, contact the veterinarian.

An encounter with a snake can also create a pet emergency situation. See the next section for how to treat snakebites.

How to Treat a Dog That Has a Snakebite

©2006 Publications International, Ltd. Poisonous bite

Poisonous snakebites are rare in North America. Most snakes are nonpoisonous, and neither poisonous nor nonpoisonous snakes will attack a dog unless provoked. But many pets are curious, and bites will occur.

If you live in or visit a snake-inhabited area, you can expect problems if you let your dog run loose. Be prepared by reading the following tips for treating snakebites.

Advertisement

Poisonous

The signs of a poisonous snakebite are two fang marks, pain, swelling, vomiting, difficulty breathing, and possible paralysis and convulsions. Be sure to watch for sings of shock, which include pale or white gums, a rapid heartbeat, or rapid breathing.

Treatment must begin as soon as possible after the bite. If the snake was killed, bring it to the veterinarian for identification. Otherwise, try to remember identifying marks.

Step 1: Restrain the dog if necessary.

Step 1a: Approach the dog slowly, speaking in a reassuring tone of voice.

Step 1b: Slip a leash around the dog's neck, then place the leash around a fixed object. Pull the dog against this object and tie the leash so the dog cannot move its head.

Step 1c: Muzzle the dog to protect yourself if necessary.

Step 2: Clip the hair from the bite area.

Step 3: Flush thoroughly by pouring 3% hydrogen peroxide directly on the bite.

Step 4: Transport the dog immediately to the veterinarian.

Nonpoisonous

©2006 Publications International, Ltd. Nonpoisonous bite

The signs of a nonpoisonous snakebite are a U-shape bite and pain in the bite area. If you are not sure the snake is nonpoisonous, treat as poisonous. See above.

Step 1: Restrain the dog if necessary.

Step 1a: Approach the dog slowly, speaking in a reassuring tone of voice.

Step 1b: Slip a leash around the dog's neck, then place the leash around a fixed object. Pull the dog against this object and tie the leash so the dog cannot move its head.

Step 1c: Muzzle the dog to protect yourself, if necessary.

Step 2: Clip the hair from the bite area.

Step 3: Flush thoroughly by pouring 3% hydrogen peroxide directly on the bite.

Various injuries may cause unconsciousness in a dog. Turn to the next section for tips on what to do in this emergency situation.

How to Treat an Unconscious Dog

©2006 Publications International, Ltd. Steps 1a, 1b, and 1c

Your first priority when dealing with an unconscious dog is to get the heart beating and the dog breathing. Also be sure to watch for signs of shock, which include pale or white gums, a rapid heartbeat, or rapid breathing. Use the following tips to provide proper treatment to a dog that has lost consciousness.

Step 1: If you suspect choking, clear the dog's airway. If the dog is not choking, proceed to

Advertisement

Step 2.

Step 1a: Open the dog's mouth carefully by grasping the upper jaw with one hand over the muzzle.

Step 1b: Press the dog's lips over the upper teeth by pressing your thumb on one side and your fingers on the other so that the lips are between the dog's teeth and your fingers. Apply firm pressure to force the mouth open.

Step 1c: If you can see the object, try to remove it with your fingers.

Step 1d: If you cannot remove the object and the dog is small enough, pick it up by grasping its back legs; turn it upside down and shake vigorously. Slapping its back while shaking may help to dislodge the object.

Step 1e: If you cannot remove the object and the dog is too large to pick up, place the dog on its side on the floor. Place your hand just behind the rib cage and press down and slightly forward quickly and firmly. Release. Repeat rapidly several times until the object is expelled.

Step 1f: If you cannot dislodge the object, transport the dog immediately to the veterinarian.

Step 2: If the dog is breathing, check for shock. If the dog is not breathing, proceed to Step 3.

Step 2a: Examine the gums by gently lifting the upper lip so the gum is visible. Pale or white gums indicate the dog is almost certainly in shock and may have serious internal injuries and/or bleeding. If the gums are pink, the dog is probably not in shock.

©2006 Publications International, Ltd. Step 2c

Step 2b: Determine the heartbeat. Place fingers firmly on the dog about 2 inches behind the dog's elbow in the center of its chest. Count the number of beats in 10 seconds and multiply by 6. If the dog is in shock its heartbeat may be more than 150 beats per minute.

Step 2c: Place the dog on its side with its head extended. Gently pull out the dog's tongue to keep the airway open.

Step 2d: Elevate the dog's hindquarters slightly by placing them on a pillow or folded towels. To conserve body heat, wrap the dog in a blanket or jacket.

Step 2e: Transport the dog immediately to the veterinarian.

Step 3: Feel for a heartbeat by placing your fingers about 2 inches behind the dog's elbow in the middle of its chest.

©2006 Publications International, Ltd. Step 3

Step 4: If the dog's heart is not beating, proceed to Step 5. If it is, perform artificial respiration.

Step 4a: Turn the dog on its side.

Step 4b: Hold the dog's mouth and lips closed and blow firmly into its nostrils. Administer 1 breath every 3 to 5 seconds. Take a deep breath, and repeat until you feel resistance or see the dog's chest rise.

Step 4c: After 10 seconds, stop. Watch the chest for movement to indicate the dog is breathing on its own.

Step 4d: If the dog is not breathing, continue artificial respiration.

Step 5: If the heart is not beating, perform CPR.

CPR for Dogs Weighing up to 45 Pounds

©2006 Publications International, Ltd. Step 5c

Step 5a: Turn the dog on its back.

Step 5b: Kneel down at the head of the dog.

Step 5c: Clasp your hands over the dog's chest with your palms resting on either side of its chest.

Step 5d: Compress your palms on the chest firmly for a count of "2," and release for a count of "1." Moderate pressure is required. Repeat about 60 to 90 times per minute.

Step 5e: Alternately (after 30 seconds), hold the dog's mouth and lips closed and blow firmly into its nostrils. Blow for 3 seconds, take a deep breath, and repeat until you feel resistance or see the dog's chest rise. Try to repeat this 10 to 20 times per minute. As a general rule, use a CPR ratio of about 5 heart compressions to 1 breath of air.

Step 5f: After 1 minute, stop. Look at the chest for breathing movement, and feel for a heartbeat by placing your fingers about 2 inches behind the dog's elbow in the center of its chest.

Step 5g: If the dog's heart is not beating, continue CPR. If the heart starts beating, but the dog is still not breathing, return to Step 4.

CPR for Dogs Weighing more than 45 Pounds

©2006 Publications International, Ltd. Step 5b

Step 5a: Turn the dog on its side.

Step 5b: Place the palm of your hand in the middle of the dog's chest.

Step 5c: Press for a count of "2," and release for a count of "1." Firm pressure is required. Repeat about 60 to 90 times per minute.

Step 5d: Alternately (after 30 seconds), hold the dog's mouth and lips closed and blow firmly into its nostrils. Blow for 3 seconds, take a deep breath, and repeat until you feel resistance or see the chest rise. Try to repeat this 10 to 20 times per minute.

Step 5e: After 1 minute, stop. Look at the chest for breathing movement, and feel for a heartbeat by placing your fingers about 2 inches behind the dog's elbow in the center of its chest.

Step 5f: If the dog's heart is not beating, continue CPR. If the heart starts beating but the dog is still not breathing, return to Step 4.

Step 6: Transport the dog immediately to the veterinarian. CPR or artificial respiration should be continued on the way to the veterinarian or until the dog is breathing and its heart is beating without assistance.

Like diarrhea, vomiting is not necessarily a serious problem unless a dog becomes dehydrated. Check the next page for tips on what potential problems to look for.

How to Treat a Vomiting Dog

Vomiting is one of the most commonly encountered problems in veterinary medicine. It is nature's way of permitting the dog to rid its stomach of an irritating substance such as spoiled food.

But not all vomiting is due to simple irritation. More serious causes are viral infections or diseases of the liver, pancreas, or kidney. It is important to seek professional help if there are signs of bleeding or if the dog is depressed and still vomiting after initial efforts at control have failed. Here are some tips for treating a vomiting dog:

Advertisement

Step 1: Remove all food and water for at least 12 to 24 hours.

Step 2: If vomiting contains blood or is frequent, contact the veterinarian immediately. If not, proceed to Step 3.

Step 3: After 12 to 24 hours of no vomiting, introduce water gradually at 1 to 2 ounces at a time. If no vomiting occurs, offer a bland diet of boiled skinless chicken and rice (50:50 mixture). If this is held down, transition to regular diet over the next 2 days by mixing an increasing quantity of regular dog food with bland diet.

Step 4: Pepto-Bismol can be safely used for dogs. Call the veterinarian for recommended dose.

A dog giving birth to puppies can be quite an amazing experience -- for both the dog and its owner. Turn to the next page to learn how to be prepared to help a dog if problems occur during the birth process.

How to Help a Dog That Is Having Puppies

©2006 Publications International, Ltd. Step 1

A dog's normal length of pregnancy (gestation period) is 61 to 63 days. However, delivery 1 or 2 days earlier or later is not unusual and presents no cause for alarm as long as the general health of the dog is good.

In preparation for whelping, the dog will make a nest with newspapers and rags if they are available. If they are not, she may dig into the carpeting with her front paws, almost as if she were digging a hole. This is termed "nest building" and is a fairly consistent sign that delivery will follow soon, usually within 2 to 3 days. To make your pet feel comfortable about delivering (and to save your carpet!) provide a whelping box with plenty of newspapers and rags.

Advertisement

At about the same time the nest building occurs, you should also notice an enlargement of the breasts with milk production. Another fairly consistent method of determining when the dog will deliver is to take her temperature each day. Approximately 24 hours before delivery, her temperature will drop about 2 degrees Fahrenheit/1 degree Celsius.

When she is getting close to labor, a mucous discharge appears at the vulva followed by a greenish discharge. At no time should there be a brown or foul-smelling discharge. If this is present, contact your veterinarian immediately.

The onset of labor will make the dog somewhat restless, but it is not until the second stage of labor that she will actually lie down and have abdominal contractions. Once the second stage of labor begins, delivery should begin within 3 hours. If no pups are delivered by that time, professional help should be obtained.

A puppy may be born in one of three ways. The most common presentation is head and feet first. The second most common is rear legs and tail first, not to be confused with a true breech birth. In a true breech only the rump is presented, with the rear legs folded under the body of the puppy. In a small bitch, this type of presentation can cause problems and should be watched for carefully.

Complications may arise during the birthing process that you can handle quite easily by using the tips below.

If the Puppy Is Stuck in the Birth Canal Half Exposed

Step 1: Grasp the puppy with a clean towel.

Step 2: Applying steady traction, gently pull the puppy at a slight downward angle. Continue pulling gently and steadily until the pup is delivered.

Step 3: If you are unable to remove the puppy, contact the veterinarian immediately.

If the Mother Doesn't Clean the Puppy After Delivery

©2006 Publications International, Ltd. Step 2

Step 1: Put the pup, covered in the fetal membrane, on a clean towel.

Step 2: Peel the membrane off its face immediately.

Step 3: Continue to pull the membrane from its body. The membrane will collect around the umbilical cord. DO NOT pull on the umbilical cord.

Step 4: Wipe any fluid off the nostrils and mouth. Rub the puppy's body vigorously with a towel to stimulate breathing.

Step 5: If there is heavy mucus in the mouth and nose, clean out what you can with your finger.

Step 6: If the puppy is still having trouble breathing:

Step 6a: Place the puppy in a towel on the palm of your hand.

©2006 Publications International, Ltd. Step 6c

Step 6b: Cradle its head by closing your thumb toward your fingers.

Step 6c: Using your other hand to secure the puppy, lift your hands to head level and swing firmly down toward the floor. Repeat several times.

Step 6d: Vigorously rub the puppy again with the towel.

Step 6e: Stop when the puppy is actively moving and crying.

Step 7: Tie a thread around the umbilical cord about 1 inch above the puppy's abdomen. Leaving the tied portion attached to the puppy, cut off the rest of the umbilical cord and fetal membrane.

Step 8: Place the puppy with its mother. She will take care of the rest. If she does not take care of the puppies, or if any other problem develops, contact the veterinarian as soon as possible.

Seeing a dog hurt or in distress can be such a helpless feeling. By learning the tips outlined in this article, you can arm yourself with dozens of first-aid techniques that may end up saving the life of your beloved pet.

©Publications International, Ltd.