How to Set Up an Aquarium

aquarium setup, initial steps
Before you begin setting up your aquarium, you'll want to have a good idea of what you want it to look like upon completion. See more aquarium fish pictures.
© Jeff Kubina

Setting up your aquarium should be a relatively simple procedure. You should be able to get the whole system up and running in a couple of hours at the most, although you'll have to wait some time before you add the fish.

The most important thing for you to do before you begin is to be sure you're prepared. Know in detail what you want the aquarium to be like when you're done, and be sure you have all the equipment, space, and tools you'll need.

Advertisement

A new, brand-name tank will almost certainly not leak, but you may want to be absolutely sure about this before setting up the tank in its final location. Choose a dry area, cover it with newspapers, and place the tank on them. Very carefully fill the tank to the rim with cool water and wait for an hour or two. If the newspapers are wet, you know you have a problem with your tank.

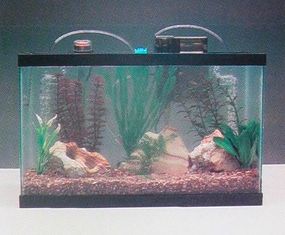
If there are no leaks, empty the tank, wipe out the interior, and place it on the aquarium stand in its permanent location. If you like, you can apply a background material to the back of the tank. This is optional, but many fish feel more secure if the back and sides are covered. Once this is done, you are ready to install the filtration system.

Aquarium Fish Image Gallery

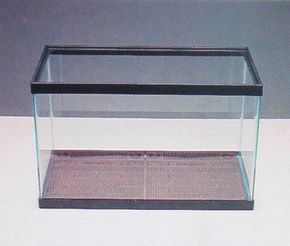
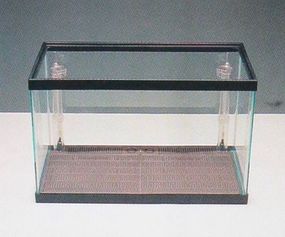
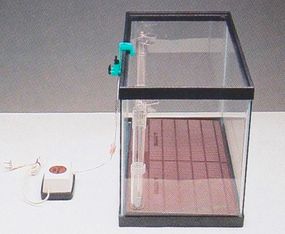
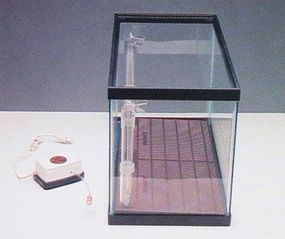
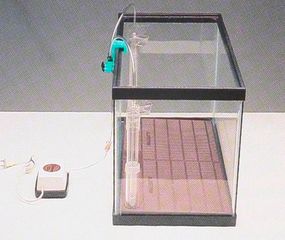
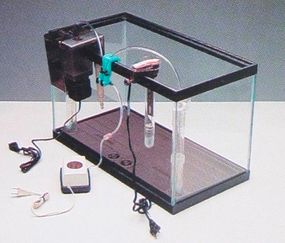
The undergravel filter plate should be rinsed thoroughly and then placed in the tank. If the plate does not fit the bottom exactly, place it so that it is up against the back of the tank and centered.

The lift tubes can be installed next. Because the tubes are designed to fit the tallest tanks, you may need to cut them to fit your particular aquarium. If so, cut the tubes so that the tops will be just below the surface of the water when the tank is filled.

Next, you must hook up all of the air line tubing to the undergravel filter and any air stones. Connect a length of tubing to the air pump.

If you are using a check valve to ensure that no water can flow into the air pump, make sure it is facing the correct direction. There is often an arrow on the body of the valve indicating this. You can also test the valve by blowing into either end to determine which way it allows air to flow.

Cut lengths of air tubing to go from the check valve to the gang valve or directly to the air line stems at the top of the undergravel lift tubes. Even if your air pump has two outlets and you are only using two lift tube air stones, a gang valve offers better control of the air flow to each piece of equipment.

When using a gang valve, the lines going to it from the air pump are connected at the side of the valve, and the lines going from the gang valve to the tank are connected at the top of the valve.

Be sure that there is a small amount of slack in the air tubing to avoid kinking the lines and blocking the flow of air. The air line going to the lift tubes or to any air stones in the tank should run through the appropriate openings in the back of the tank hood.

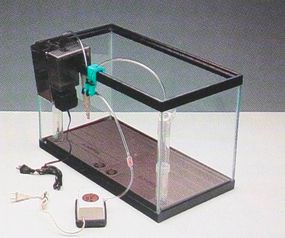
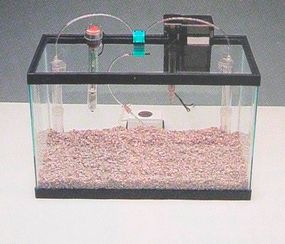
If you are using powerheads instead of an air pump to create water flow through the lift tubes, the lift tube should go into the opening in the plate that is one over from the corner opening. In this situation, the lift tubes can't go in the corner openings because powerheads won't fit into the corners of the tank after the hood is installed.

All other openings in the undergravel filter should be closed with the caps provided with the filter. For undergravel filters with just one plate, only one powerhead is usually necessary.

Learn more about aquarium setup on the next page.

To learn more about freshwater aquariums, see:

Advertisement

Aquarium Setup: Filters and Gravel

aquarium setup, filters and gravel
When aquascaping your aquarium, keep in mind the look you want to achieve as well as the needs of each fish.
©2007 Publications International, Ltd.

The mechanical aquarium filtration system is the next step in the process. You have a great variety of filters to choose from, and each has its own particular requirements for preparation. Some may need assembly and others may not. Read the instructions that came with the filter and follow them carefully.

If you still have trouble fitting everything together, check with your dealer. This is part of the service that the store you bought the filter from should offer.

Advertisement

Set the filter up but don't plug it in yet. Set up the temperature control system for your tank. As with the mechanical filters, you have many heaters and thermometers to choose from. Follow the specific instructions provided with your equipment. Put everything in place but don't plug the heater in yet.

With the filters in place and the thermometer set up, you are now ready to begin aquascaping. For biological filtration, an inch of gravel would be adequate, but for stability and aesthetics, two to three inches is better. As an estimate, two pounds of gravel per gallon of water is probably the minimum amount to purchase.

All gravel should be rinsed in small quantities in a bucket under running water before it goes into the aquarium. Stir the gravel in the bucket and continue rinsing until the water is no longer cloudy and has no solid matter floating in it.

As you add gravel to the tank, place more toward the back so that when you are finished, the gravel slopes down to the front of the tank. The visual effect of the sloping tends to make the tank look deeper.

Also, the slope will tend to cause the various bits and pieces of organic matter that accumulate on the gravel to work their way to the front of the tank, where they can be more easily removed. The slope will also even the flow of water through the undergravel filter.

The lift tube that draws the water through the filter plate is at the back of the tank, so it has less of an effect on the water at the front of the tank. If the gravel at the front isn't as deep, though, it creates less resistance for the water to overcome, and the flow of water through the gravel will be roughly the same near the lift tube as it is away from the lift tube.

After the gravel has been laid down, you can add any other aquascaping materials. Remember to think about the arrangement. You're creating a terrain of sorts for your fish, and you must consider them.

They'll want caves and crevices for hiding, and any territorial species will want bounded areas they can claim as their own.

Also remember that you should like the way it looks. The backdrop you're creating can have a big impact on the aquarium's overall look, so it pays to get it right. Don't add any plants yet; they will go in after the tank has been partially filled.

Go to the next page to find out how to prepare water for your aquarium.

To learn more about freshwater aquariums, see:

Advertisement

Aquarium Setup: Water

aquarium setup, water
Tall plants look better in the back, with shorter ones in front.
©2007 Publications International, Ltd.

It's finally time to add some water to your aquarium, but don't fill the tank just yet. Pour in only enough water to fill two thirds of the tank, and use lukewarm water from the tap.

Don't use hot water, which can crack the glass. Cold water is no problem, but it can take quite a while for the aquarium heater to bring it to the correct temperature.

Advertisement

Another option is to use a high-quality kitchen thermometer and mix the hot and cold water until it reaches the desired temperature.

To avoid disturbing the aquascaping, the flow of water into the tank should be eased somehow. One method is to lay newspapers over the aquascaping, pour the water on the papers, and then remove them. You can also place a bowl or cup on the gravel and pour the water into that.

A third possibility is to place one of your hands palm up in the tank just above the gravel and pour the water onto your hand. You can also use one of the bulkier, more stable pieces of aquascaping -- a rock, for instance -- to break the flow of the water.

With the tank two-thirds full of water, the live or plastic plants can go in. Tall plants will look best in the back, and you can use them to hide the lift tubes, heater, air tubing, and other equipment. Smaller plants can go on the sides and near the front of the tank. Clustering plants around rockwork often creates a nice effect.

Do not mix species of plants so that they are scattered throughout the tank. In nature, plants of the same species grow in groups, and you want to duplicate this effect in the tank. Plants of the same species growing together are also often of different sizes, representing a mixture of young plants and mature plants.

The tank now has everything in it except the fish, and you can add the rest of the water. Add enough so that the waterline will be hidden by the hood. The water you're adding should be about the same temperature as the water already in the tank. After the tank is completely filled, you can begin turning on the equipment.

With all of the valves of the gang valve completely open, turn on the air pump. Air bubbles should be flowing from all air stones. Adjust the gang valve to even out the air flow. It is very important that the bubbles flow equally from all lift tubes, if you have more than one.

If the flow is greater in some tubes than in others, the undergravel filter may not work correctly because the tubes with the strongest flow can actually pull water down the tubes with the weakest flow.

Find the final steps to aquarium setup on the next page.

To learn more about freshwater aquariums, see:

Advertisement

Aquarium Setup: Final Steps

aquarium setup, final steps
Only when you are sure that the tank is running properly and will be a healthy aquatic home should you actually go shopping for your first fish.
© Quartermass

Once the undergravel filter is operating properly, you're ready for the final steps in aquarium setup.

First, the power filter can be started. The filter box or canister must be at least half full of water in order to prime the filter. The body of some filters is marked where the water level should be.

Advertisement

Plug the filter in. The filter will fill with water to its normal operating level while any air in the system is expelled. After this has happened, the filter should run smoothly.

The heater can be plugged in now. When the water temperature of the tank is already at or very close to where it should be, setting the thermostat is easy. When the thermometer says that the water temperature is in the proper range, adjust the heater control until the heater's indicator light comes on.

Then, turn the knob the other way just enough for the light to go out. Over the next day or so, check two or three times to see if the heater is maintaining the temperature as it should be. It may take a couple of days to get the heating unit set at the correct level.

Add enough water conditioner for the volume of water in the tank. The hood can be closed and the light turned on. Clean the glass and then stand back and admire your work.

Let the tank run for at least a day and keep an eye on things. Check the temperature and note that the filters are operating properly. Don't be surprised if the water becomes cloudy on the second day. This is most likely the result of bacteria responding to light and warmth. It will clear up in a few days.

Only when you are sure that the tank is running properly and will be a healthy aquatic home should you actually go shopping for your first fish. While you wait, spend some time learning as much about aquarium fish as you can.

Find a step-by-step overview to setting up your aquarium in our final section.

To learn more about freshwater aquariums, see:

Advertisement

Starting Up an Aquarium Step-by-Step

aquarian setup, step1
Step 1
©2007 Publications International, Ltd.

Below are step-by-step instructions, with photo illustrations, of how to start up an aquarium.

1. Position the undergravel filter plate in the bottom of the tank.

Advertisement

2. Install the lift tubes along with their air stones and air line tubing.

aquarian setup, step2
Step 2
©2007 Publications International, Ltd.

3. Begin to set up the air pump. Attach a length of air line tubing and a one-way check valve to the pump.

aquarian setup, step 3
Step 3
©2007 Publications International, Ltd.

4. Run a length of tubing from the check valve to a gang valve, and position the gang valve on the tank.

aquarian setup, step 4
Step 4
©2007 Publications International, Ltd.

5. Run tubing from the gang valve to each of the lift tubes.

aquarian setup, step 5
Step 5
©2007

6. Install the mechanical filtration unit. Carefully follow any assembly or installation instructions from the manufacturer.

aquarian setup, step 6
Step 6
©2007

7. Install the heater/thermostat unit. Again, carefully follow any instructions from the manufacturer.

aquarian setup, step 7
Step 7
©2007

8. Rinse the gravel thoroughly before adding it to the tank. Put more gravel in the rear of the tank, creating a gentle downward slope from back to front.

aquarian setup, step 8
Step 8
©2007

9. Add rockwork, driftwood, or any other large aquascaping material. Push them firmly into the gravel bed and build up a little gravel around their bases to position them securely.

aquarian setup, step 9
Step 9
©2007

10. Fill the tank two-thirds full with water. Make the water as close as possible to the desired temperature of the aquarium, and pour it carefully so the aquascaping is not disturbed.

aquarian setup, step 10
Step 10
©2007

11. Add plants to the tank. Proper positioning can help to make the equipment less obvious. Fill the tank the rest of the way with water.

aquarian setup, step 11
Step 11
©2007

12. Add the thermometer. Turn on the equipment, one piece at a time, and make any necessary adjustments.

aquarian setup, step 12
Step 12
©2007

To learn more about freshwater aquariums, see:

Advertisement

Advertisement

Loading...